Showing posts with label Organics. Show all posts

Sunday, June 1, 2014

MMMMmmmm Muffins

Have I mentioned I like baked goods? MMMmmmmm Hot from the oven, yummy, fluffy, baked goods. With my eating plan cutting out all wheat and sugar, it has put a big dent in my enjoyment of baked goods. This isn't just a gluten free thing, it's a no wheat thing so gluten free flours are out. 

I have found a way to make cookies, both baked and no-bake but I wanted more. This morning I jumped into muffin making with both feet, and by am I glad I did! YUM!

These muffins use buckwheat flour, which is not a wheat, surprisingly. Buckwheat is made from the seeds of a fruit which are in the same family as rhubarb. See this wikipedia link for more info: Buckwheat. Since it isn't a wheat there is no gluten in it naturally. I am eating for heath these days and buckwheat seems much healthier to me than overly processed wheat. 

I also used almond meal or flour and some gluten free oats. These 2 ingredients made the muffins more dense and hearty than what we made in my Rum Cake Donut Muffin recipe.

To replace the sugar, I used Xylitol and Stevia. Both of these sweeteners are natural and do not include chemicals. Stevia is an herb and Xylitol is made from birch. Neither of these sweeteners raise blood sugar nor impact the pancreas. 

Taking all of that in mind, here is the recipe.  

Note that the buckwheat will make them dark. The batter will be dark and the muffin will be dark. But the flavor is great. Give them a try!  


Healthy Muffins (makes 32 mini muffins)

1/2 cup organic buckwheat flour
1/2 cup almond meal or flour
¾ cup gluten-free oats 
1-½ teaspoon baking powder
½ teaspoon salt
¾ teaspoon nutmeg
¾ teaspoon cinnamon


⅓ cup coconut oil
½ cup organic birch Xylitol
1 packet Stevia
1 egg (for vegan, substitute a flax egg)
¾ cup almond milk (or coconut or hemp)

Preheat the oven to 350ยบ. Whisk together the flours, oats, baking powder, salt, nutmeg, and cinnamon.

In a separate bowl, add coconut oil, sugar, egg, and milk. Mix to combine until thoroughly blended.

Add dry ingredients to wet ingredients and stir only to combine.

Coat your muffin pan with a little coconut oil cooking spray and scoop the batter evenly among the cups. I filled a 24 mini-muffin tin and had enough for another 8.

Bake at 350 degrees for 8-12 minutes. The muffin should spring back when you lightly touch the top.

Let the muffins cool for about 10 minutes in the pan. Remove from pan and allow them to cool another half hour or so. 


Topping

Ingredients: 
3 Tablespoons Earth Balance "butter"

3 Tablespoons Xylitol or 1 teaspoon Stevia
2 teaspoons cinnamon

Melt the butter in a microwave safe bowl or on the stove. Mix the sweetener and cinnamon in a second bowl. Quickly dip the muffins in the butter and then roll them in the sweetened cinnamon. I just did the tops but you can do the whole muffin if you want--you just may need to double your topping recipe to cover all the muffins.

Tap off any excess cinnamon and they are ready to eat. 


I am loving the fact that I don't need flour or sugar to make a yummy treat. Hope you enjoy them too! 

Laureen

Tuesday, May 20, 2014

Chocolate Oatmeal No-Bake Cookies

When I was young we used to make a chocolate oatmeal peanut butter no-bake cookies. I loved them. Sometimes we were lucky if they made it onto the wax paper. We would all grab spoons and dig in.

But since February, I have removed all sugar, dairy, and wheat from my life, not to mention peanuts. This makes it hard to make a good cookie. 

Last night I was craving chocolatey goodness so I decided to remake the standard recipe to align with my current eating plan. Here is a link to the original recipe: Chocolate Peanut-Butter No Bake Cookies


The original recipe calls for 2 cups of sugar, cocoa powder, a stick of butter, and a cup of peanut butter. All no-nos for me at the moment. 
While mine didn't turn out as gooey as the originals, they are pretty darn tasty and satisfied my cravings. The cookies from the recipe below are for those of us that love dark, bitter chocolate. If you prefer a sweeter cookie you can add more Stevia, or if you are ingesting sugar, you can add honey, maple syrup, etc. 

Chocolate Oatmeal Almond Butter No Bake Cookies


5 Tablespoons block cacao (unsweetened)
1/3 cup coconut oil
2 Tablespoons Earth Balance "butter"
1 Tablespoon Stevia (more if you want a sweeter cookie)
1 cup almond butter
1 cup almond milk
2 teaspoons vanilla
2 1/2 cups oatmeal

Melt the cacao, coconut oil, butter, milk, and Stevia in a pan on the stove. Don't boil. Just melt everything well. 

 
Remove from heat and add almond butter. Mix well. If it isn't melting into the chocolate mixture, put it back on the heat for a minute. 


Add the vanilla and oatmeal and mix well. If the mixture is too dry add more almond milk a Tablespoon at a time until mixture is a thick dough consistency. Taste the cookies, adjust sweetness levels. 

 
Roll into balls and put on wax paper to cool.
Enjoy! 


Nom, nom!
Laureen


Saturday, March 22, 2014

Traveling Healthy: Cooking in my Hotel Room without Setting off the Fire Alarm


I love science. Science experiments are fun to me. Any experiment is fun for the most part. I am on business travel for a few weeks and I really want to stick to this eating plan. It's been more difficult than I thought because I am having trouble finding cooked organic food in the area. I have this lovely little family owned organic grocery near my home. 

Here they have gargantuan stores with restaurants inside the grocery. Seriously. It is the oddest thing. I have been taking pictures and sending them home to my husband. 

But most of the food isn't organic. My solution? Purchase a Rival Electric Skillet from Amazon and have it shipped to the hotel. I am an Amazon Prime member, so it arrived in 2 days. 

When it arrived I looked at it and realized it would cause steam, smoke, and heat. Will it set off the smoke alarms? 

I get evacuated from hotels enough. For a while the alarms would go off in my hotel about every other trip (I did not cause the evacuations). On a side note, it's really funny to see what people sleep in. As such I always pack sweats and tennis shoes and keep them near the bed. 

So this morning I made breakfast. In the skillet. In the room. And to be extra daring, I cooked bacon. Smoky--needs decent heat to cook--bacon. I also made scrambled eggs and for the first time noticed how much steam comes off of the darn things. But it worked! NO ALARMS! SUCCESS! 

Breakfast is served. 

I use Applegate Farms Bacon because it is nitrate free and organic. It has the best taste. I brought salt, pepper, and oregano with me, since I like to season my eggs with them. Organic eggs were pretty easy to find.

Now to clean up the mess and air out the bacon smell in the room before they come in to clean. 

Bacon grease disposal
I used a combination of a hotel glass and extra baggies I had brought with me to dispose of the bacon grease. Line the cup with plastic and the baggie. Wrap the top of the baggie over the edge of the glass. Wait for the grease to cool a bit, then pour it into the baggie-lined glass. Set it near the air unit in the room to congeal. Once solid, remove the baggie from the glass, seal it, and dispose. Viola!  

Here is to staying healthy, one small step at a time. 


Happy, healthy, travels!  
Laureen

Sunday, February 9, 2014

Breakfast Cookies; Gluten Free and Packed with Nutrition

My husband recently had an appointment with a naturopath. One of the outcomes of his appointment was a change in diet. We had started on the road to eating healthy years ago, cutting out all non-organic foods and removing white sugar and flour even if it is organic. 

So now we need to remove all gluten, all dairy, and have certain foods only once a week. All chips and snacks need to be homemade because store bought gluten free products still contain a lot of sugars or cost an arm and a leg. 

We have found things to eat but many of them are time consuming. In an effort to make more "grab and go" foods, I created a "breakfast cookie" recipe. 


My grandmother used to make us breakfast cookies when I was a kid. Hers were primarily a chocolate chip cookie base with some healthier cereals tossed in instead of chocolate chips. They were sweet and yummy. 


Laureen's Breakfast Cookies

All ingredients should be organic. I have included links to items so you can see what they look like before you go searching for them. Or if you are like me and work all week, order them using Amazon Prime and have them delivered to your door.

1 cup freshly ground almond butter (my local organic grocery sells fresh ground)
1 large egg
1/8 cup almond, hemp or coconut milk
1 1/2 teaspoons vanilla


heaping 1/8 cup shelled hemp seeds
heaping 1/8 cup chia seeds
heaping 1/8 cup hulled buckwheat groats
 

3 packets Stevia
1/2 tsp baking soda (aluminum free)
1/2 tsp baking powder

1 tsp cinnamon
3/4 tsp nutmeg
1/2 tsp sea salt


In a large food processor bowl, add almond butter and egg. Blend to combine. Add milk and vanilla and blend until thoroughly mixed. The mixture should start to look like a batter. 

Add hemp, chia, and buckwheat and blend to combine. Add all remaining ingredients and blend until mixed well. 

Preheat over to 350'. Cover a cookie sheet with parchment paper and scoop out a heaping tablespoon of dough. Roll into a ball and place about 2" apart on the cookie sheet. 

Press down on each ball with a fork to flatten a little. Cook for 10 minutes or until cookie is set. 


Let cool and enjoy!
Laureen

Saturday, February 1, 2014

Gluten Free Crackers - Base recipe and alternatives

My husband was recently told to not eat gluten or any sugar. No honey, no sucanat, no coconut sugar, no wheat or oats at all. I immediately started my quest to continue eating foods we love without the ingredients that harm us.

I found some cracker recipes on Pinterest and they looked good but I wanted more flavor. I took a little from one recipe, a little from another and came up with this. 


These really are as good as they look. My first attempt at making crackers, first time using parchment paper (I know, I know), and look how yummy they look! This picture wasn't even enhanced.

Gluten Free Crackers (Base recipe) 

2 cups almond flour or meal
1/2 teaspoon salt

2 Tablespoon white sesame seeds (or 1 T black seeds and 1 T white)
1/2 teaspoon onion powder

1/2 teaspoon garlic powder
 
1 egg
2 Tablespoons olive oil

1 Tablespoon water (if needed)

Makes 18-20 crackers


Alternatives:

Herbed - I added Italian herbs to mine. Add:
  • 1 teaspoon dried oregano
  • 1 teaspoon dried basil 
  • 1/2 teaspoon onion powder (in addition to the half called for in the base recipe
  • 1/2 teaspoon onion powder (in addition to the half called for in the base recipe 

Instructions: 

Mix all dry ingredients. You can mix this together in a tightly sealed container and store it as a dry cracker mix. 

Add in wet ingredients and mix until ingredients come together to form a dough. 

Preheat oven to 350'. 

Put a sheet of parchment paper on a counter so you can roll out your dough on it. Dump the dough out onto the parchment paper and using your hands kneed it into a ball. Smash down the ball into a disk. 

Put another piece of parchment paper on top of the disk of dough and roll out until the dough is about 1/4" thick. The dough rolled really easily for me and it was easy to make it too thin on the edges. 

When the dough is rolled to the right thickness, peel off the top layer of parchment paper. Use a pizza cutter to cut the crackers into approximately 1" squares. Move the entire sheet of parchment paper, with cut crackers onto the baking sheet. Sprinkle with sea salt.

Bake at 350' for 10 minutes. Check the crackers. The edge crackers should have started to brown and the center should be set but not quite crispy. Remove any edge crackers that look done. They are ready for eating. The center crackers will need to still be cooked more to crisp up. Use a small spatula to break the crackers apart and put space in between them so the edges can brown. 

Pop the pan back into the oven and cook for another 5-10 minutes until crackers are browned and more crisped. 

We ate almost all of these crackers in one sitting because they tasted so good. They would also be good with toppings. 

Enjoy! 
Laureen

Friday, January 31, 2014

Raw Food Cookies Truffles

Eight years ago I had a really scary diagnosis. Doctors told me I was just under the levels for multiple myeloma, a bone marrow and blood cancer. I was sent off to a hematology oncologist with instructions to not worry. HA!

So long story short, this diagnosis started my trek to become more healthy. I cut out man-made chemicals from my life as much as possible, and I started eating organic foods. Since that time I have taken many supplements, worked many detox programs, and I continue to change my eating habits.

I have made it 8 years without progressing to cancer. No chemo or bone marrow transplants for me!

What I have found works best is to change one thing at a time. Just keep making one more thing healthier in your life. We know white sugar is no good, so try honey, evaporated cane juice, sucanat, or coconut sugar. Then work on replacing the flour you use with healthier ones. Buy unbleached flour, then add in half oat flour, or try some almond flour.

Through using this method of making every recipe just one step healthier, I am finding I can have all sorts of yummy things and give my body nutrients at the same time! The possibilities are endless!
 

Recently, my husband also had some health issues. We went to a Naturopath and we got instructions for further refining our diets. With this new list of foods in mind, I created a new Raw Food treat that tastes so good, like a truffle, and is packed with nutrients. Not a bad ingredient in it! 

Raw Food Cookie Truffles

1/2 cup raw almonds
1/2 cup raw walnuts 
1/2 cup almond flour
1/2 teaspoons ground cinnamon 
1/8 teaspoons sea salt 
1 packet Stevia

1-3 Tablespoons hemp, coconut, or almond milk
1 1/2 teaspoons pure vanilla extract


Optional Additions:
3 Tablespoons raw cacao

3 Tablespoons chia seeds
1/4 teaspoons nutmeg


Instructions
  1. In a food processor, process the almonds, walnuts, and almond flour until the oil starts to come out of the nuts. It will be grainy but should look like it is well on it's way to becoming a nut butter.
  2. Add the cinnamon salt, Stevia, milk, and vanilla. Process to combine.
  3. Taste the "dough." If it is not sweet enough for you add a little more Stevia.
  4. Next, add the optional ingredients and pulse just to combine. Taste again. Adjust flavors. My raw cocoa is very bitter and sometimes I need to add a little more sweetener.
  5. Roll the cookie dough into balls about 1 tbsp each and place them in a tightly covered container. You can freeze them to make them more firm but they do not need to be refrigerated. 
These truffle cookies are excellent to bring with you when traveling. They have all sorts of healthy proteins and fats in them. They also taste like you are eating something you shouldn't be eating. Hope you enjoy them as much as I do. 


Happy Healthy 2014,
Laureen

Wednesday, January 29, 2014

Adorable Elise and her Organic Potato

I am a huge believer in organic products. We should not be eating the things that have been approved by our regulatory groups. 

Elise is a 3rd Grade student who decided to grow a potato for her science project. Sound reasonable, right? Elise discovered that she needed to purchase organic potatoes for her experiment to work. I will let her tell you the rest. 


Since a picture is worth a thousand words, enough said.

Tuesday, January 28, 2014

DIY Healthy Food - Marmalade Chicken

Chicken. It can be so boring if you let it. When I first met my husband he used to brag that he ate boiled chicken. Yuck. 

I didn't understand why he thought that was a good thing when you can add in some flavorings and make it just as healthy. 

We have a recipe for Orange Marmalade Chicken that we found on the Canyon Rance Recipes only we don't really follow the recipe. Remember to use organic ingredients!


Marmalade Chicken

4 4-oz boneless, skinless chicken breast halves
¼ tsp sea salt
¼ tsp freshly ground black pepper
2 tsp extra-virgin olive oil


Season chicken breasts with salt and pepper and sear in olive oil over medium-high heat for 1 minute on each side. 

Transfer chicken breast to a baking dish and add vegetable stock and Bragg's Amino Acids or a tamari sauce until the bottom of the pan is covered. 


Marmalade Sauce

¼ cup organic orange marmalade
½ Tbsp fresh lemon juice


Mix marmalade and lemon juice together and spoon onto chicken breasts.  

Cook in oven at 350' for 15 to 20 minutes, or until done.

The saltiness of the stock and the Amino Acids compliment the sweetness of the marmalade perfectly.

We created a tempe stirfry on the side and the meal was fabulous!

Jalapeno Chicken Recipe
(Since you know I can't leave a recipe alone)

I made a jalapeno jelly during the holidays and we recently used that instead of the orange marmalade. Oh my gosh! It was sooooo good! Jalapeno Jelly recipe coming soon.

Happy Healthy 2014!
Laureen

Thursday, January 23, 2014

Homemade Healthy Coffee Creamers - Easy and SOOOO Good!

I love coffee in the morning. Every morning. Especially after the alarm has gone off waaaay too early. See, I'm not a morning person. I try to be. I have been working at it for many years but no luck. Every time I get some time off I end up staying up late and sleeping in. It's just part of my body's natural rhythm. 

But duty calls. Work meetings often start at 7 AM so I have to be up and starting my day by 5:30 or 6:00 AM. Coffee is my saving grace at that point. 

I started drinking coffee with those flavored creamers. They made the coffee sweet and took away the bitterness. I have quite the sweet tooth so this was a yummy way to start my morning. 

As I have moved to healthier eating, I kept drinking creamers for a while since I figured I wasn't ingesting too much of them each day. However, I then realized what I was doing. I had cleaned up my diet but was ingesting chemicals, and things that cause cell inflammation, first thing in the morning and essentially starting my day in the worst possible way. 

It was time to make my own. 

I also found cacao. Ooooh. I am spoiled. I mean really spoiled. I have a friend that lives in Guatemala and has found someone who harvests WILD cacao beans, processes them as little as possible, and creates bricks of the best cacao in the world. I love this stuff. I add it to my coffee every chance I get. 

I also found raw honey and other things that make my coffee taste fabulous and make my body feel good. By the way, if you use the raw honey recommended below, take a spoonful and eat it every morning along with putting one in your coffee. 


Coffee "Creamer"

1/2 cup almond, coconut, or hemp milk, unsweetened and unflavored
2 Tablespoons Raw Honey
(adjust to taste)

3-4 Tablespoons raw cacao (adjust to taste)
1/2 teaspoon cinnamon, nutmeg or any spice you like (adjust to taste)

Add the milk, honey, and cacao to a double boiler. Heat gently until the honey and cacao are melted. Remove from heat and sprinkle in cinnamon and other spices of your choosing. Pour into a pitcher and viola! Homemade Creamer. This will last for a few days, depending on how much coffee you drink and how much creamer you use. 

 
I found these cool little Mini Glass Creamer bottles at Crate and Barrel that are now on sale for 50 cents! They are not only cute--adorable even!--but I can easily carry them to work with me so I don't have to use the creamers provided at work.


Variations:
  • Amaretto Creamer:  Add a teaspoon of almond extract to the milk instead of the cinnamon and omit the cacao for almond or amaretto flavoring. 
  • Vanilla Creamer:  Omit the cacao and add a teaspoon of vanilla extract or vanilla bean (split, insides removed, and all added to the pot with the milk). Steep the vanilla bean for at least a half hour. Strain the mixture before you put it into the pitcher. 
  • Almond "Joy": Use coconut milk, 1/2 teaspoon almond extract and 1/2 teaspoon coconut extract. You can keep the cacao or leave it out depending on your mood. 

Can you see where these recipes are going? Just add in whatever flavors you love. Keep the ingredients all organic and as unprocessed as possible. If you can't figure out the ingredients for a certain flavor favorite, post a comment and I will help. 

Now, it's time for my morning joe! Ahhhhh

Happy Sipping!
Laureen 

Saturday, January 4, 2014

Flu Fighting Tea - DIY and Organic!

I get sore throats a lot. Not just from viruses but also from talking a lot. Have I mentioned that I talk a lot? 

I recently found a great recipe on Pinterest that I have made. It makes the most soothing tea! I am also detoxing my body this year so my stomach has been upset. This also includes stuff to calm the stomach. The tea is relaxing, soothing, and smells like heaven. 


One of my sisters (I have 6) swears by gargling with alcohol (brandy, cognac, etc.) to cure a sore throat. So if you are a believer in alcohol killing all germs, feel free to do this before you drink your tea. Or add it into your tea. Everybody is different and you need to use what works for you.

You can find this recipe all over Pinterest but I will add it below too. Below the recipe I will add in additional things you can add to your tea and how they benefit your body. 


Flu Fighting Tea 

1 organic lemon
1" piece of fresh ginger
1 Cup Raw Honey-pourable

Container to put it all in. 


Slice the lemon into thin slices then cut them into pieces that will fit into your container.

Peel the ginger and use either the peeler or a knife to cut small small pieces of ginger. Fresh ginger can be quite strong so chop more finely than the lemons. Add the ginger to the container.

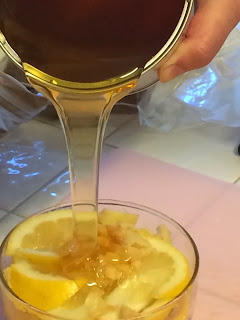
Pour the raw honey over the lemons and ginger. Use the knife to make sure the honey is seeping into all the crevices and filling the container. I fill the container with honey, but leave a 1/2" gap at the top because when the lemon juice mixes with the honey the whole mixture expands a little. 

Cover tightly and set aside. The lemon juice will be pulled out of the lemons and mix with the honey. The ginger essence will also mix into the honey making one of the most yummy concoctions. 

Eventually the lemon, including the rind, will break down in the honey and create a jelly looking mixture. 

To use: put a tablespoon or 2 into a cup and add hot, not boiling, water. Stir and enjoy. You can breathe in the scents and it will help soothe sinuses. Then sip the tea.


Ingredient benefits and additions:

Raw Honey Benefits
Lemon Benefits
Ginger Benefits

Additions:
Sprinkle any of these into your tea to add additional flavors and benefits. 

Cinnamon Benefits
Cayenne Benefits  (if your stomach is upset, don't use this one).
Alcohol (drinking too much will compromise your immune system--everything in moderation)

Here's to a #HealthyHappy2014!
Laureen

Friday, November 8, 2013

Easy Mashed Potatoes - Any Flavor, Any Consistency!

Potatoes. Mmmmmmm. Who doesn't love potatoes? They are a staple at every Thanksgiving dinner. Every family seems to have their own flavors and textures. Do you like mashed, smashed, garlic, sour cream, or plain old fashioned? 


All of these recipes start the same way and then you can flavor as you like. Making your own mashed potatoes is so easy and they are so much cheaper and healthier than the freeze dried ones. 

Below I will describe the basics of making mashed potatoes, then how to change the recipe to add in garlic, sour cream, chives, cheese, or whatever you like. 

Here is the recipe for making Basic Mashed Potatoes
  • 3 large white or yukon gold potatoes
  • 3 tablespoons butter 
  • 1/4 cup milk
  • salt and pepper to taste
Wash the potatoes. If you are leaving the skins on, be sure to scrub off all the dirt. If you are peeling your potatoes you can give them a good rinse. If peeling, peel now. Leave the skins on for lumpier smashed potatoes or remove them for creamy smooth mashed potatoes. 

Newby Note: if you have never cooked potatoes before, stick a fork in one of the raw ones to get a feel of how hard they are. You can tell they are done when they feel like the fork goes in easily (called "fork tender").

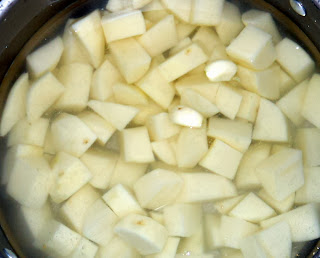
Cut 3 large potatoes into approximately 1" cubes. The size isn't as important as trying for consistency. You want the potato to cook at the same rate so you want the chunks to be close in size. 

Add the potato chunks to a pan and add cool water just to cover all the chunks. Turn the heat on to medium and let the water come up to temperature slowly. When the water is simmering, turn up the heat and boil the potatoes for about 5 minutes until fork tender. Use a colander and drain the potato chunks. 

Your potatoes are now ready for mashing or smashing, which ever you prefer. 

Add the hot potato into a bowl for mixing. I use my stand mixer. Add the 3 tablespoons of butter to the hot potatoes. Using the whisk attachment, I turned the mixer on low and slowly increased the speed. 

Lower the speed to slow and slowly add 1/4 cup of milk (almond and coconut milk work too). Stop the mixer and salt and pepper to taste. A good starting point is 1/4 tsp salt and pepper. Taste and increase as needed. 

If you want smashed potatoes, mix until you like the consistency. If you want smooth whip until the are smooth. If the mixture seems too thick, add more milk. 

This whole potato process takes about 40 minutes due to the length of time it takes for the water to heat.

Recipe Variations

For Garlic Mashed Potatoes, you can roast garlic (Click here for instructions) or you can get garlic seasoning from your grocery. There is garlic powder and garlic salt. If you purchase garlic salt, do not add the salt mentioned in the recipe above. Use the garlic salt instead. Add the garlic when you add the salt and pepper.

For Sour Cream Potatoes, add sour cream instead of the milk. If the consistency is too thick, you can thin it by adding a tablespoon of milk at a time until it has the consistency you want.  

For Sour Cream and Onion Potatoes, make the sour cream potato recipe and  add onion powder to the mixture when you add the salt and pepper.

For Sour Cream and Chive Potatoes, make the sour cream potato recipe and add in fresh chopped chives right before the final mixing. Sprinkle a few on top after you put them in a serving dish.

For Cheesy Potatoes, grate a half cup cheddar or parmesan cheese (you can add almost any cheese you like). Add it to the hot potatoes with the butter. Taste before adding the salt because some cheese varieties are pretty salty. Since the cheese can make the potatoes thicker, you may need to add a little more milk. Add additional milk 1 tablespoon at a time until the consistency is what you like. 

Let me know in the comments if there are other types you enjoy! What type of potato do you eat for Thanksgiving? 

Laureen 


Sunday, November 3, 2013

First Thanksgiving with fresh Cherried Cranberries!

Barbeque Turkey on the spit
I'm really happy this fall. I get 2 Thanksgivings. We have family visiting this weekend so we are having what we are affectionately calling "First Thanksgiving." First Thanksgiving will have all the lovely foods of the Thanksgiving we will celebrate at the end of this month but we get to eat it early. 

In my family we each make one or two things so no one has to cook all day. I have a huge family and we all cook something. My contributions are cranberries (real ones, no cans involved) and the non-alcoholic drink station. 

For the drink station, we put out water with lemon and cucumber. It is very 
easy and looks festive. I also like to provide a different flavor for the
non-drinkers and kids. This year we have bottles of pink lemonade and raspberry lemonade. You can make your own if you are really ambitious or you can do like I do and get pre-made ones and fill the bottles.

If your family traditions include cranberries in the shape of a tin can, then this recipe may not be for you. But if you like real fruit that tastes fabulous, then give it a go. You can make these well in advance and they are just as good. 

Since we will be having more than 30 at our celebration, I triple the recipe. You can use a smaller pan for the recipe below.  


Cherried Cranberries 

(adapted from a recipe by Traci's Grandmother)

1 lb cranberries, washed and stems removed
2 cups sugar
3/4 cup water
1 teaspoon cinnamon
1/4 tsp each baking soda and salt


Clean the cranberries. I put mine in a colandar and swish them around with my hand with the water running. If you see or feel a lot of stems. Turn off the water and go through each cranberry to make sure the stems are broken off and washed away.  


Put the cranberries into a saucepan and add in all other ingredients. 

Note: I make a lot of cranberries and double or triple this recipe due to the number of people I need to feed. You will have about half the cranberries shown in these pictures. 
Bubbling soda--not boiling yet

Mix all ingredients to combine well.  Turn the heat to medium high until the mixture comes to a boil. 

Make sure it's really boiling, the soda will bubble.
I peeked so you don't have to

Lower heat and simmer covered for 15 minutes. No peeking. We want the sugars to dissolve and thicken. I took the picture to the left and peeked so you don't have to wonder what is going on in there. 

After 15 minutes of simmering, remove from heat and let cool. Keep covered until cool. 

You aren't supposed to peek during this part either, but I peek and taste. If too bitter add more sugar while it's hot so the sugar will dissolve.

Let cool, put into a pretty bowl and you are ready to serve. These can also be made a few days in advance and refrigerated, or far in advance and frozen. 


Let's eat!
Laureen


Sunday, October 13, 2013

Taste of the Season - Pumpkin Bread and Spiced Honey Butter

I love to start baking in the fall. The cooler weather makes turning on the oven palatable, and the smell of fresh baked goods in the house is intoxicating. There is something so homey about coming home to the smell of something baking. YUM 

I also discovered something about pumpkin recipes. Most of them are much too sweet for me. I really like the flavor of squashes and pumpkin but not when they are overloaded with sugar. 

I found a recipe for pumpkin bread that became my base, but instead of glaze (no powdered sugar in the house required me to make other plans) I made a spiced honey butter. This honey butter may be the best thing I have ever tasted. It added so much more to the bread than a glaze!


Pumpkin Bread


3 cups all-purpose flour
2 tsp. baking powder
1 tsp. baking soda
1/2 tsp. salt
1 1/8 teaspoon ground cinnamon
heaping 1/2 teaspoons ground ginger
1/2 teaspoon ground nutmeg
1/4 teaspoon allspice


8 ounces unsalted butter, softened (for vegan use Earth Balance spread)
1 cup granulated sugar
1 cup sucanat (or packed brown sugar)
5 large eggs (for vegan use egg substitute)
1 can (15 ounces) solid pack pumpkin
2 teaspoons vanilla extract


Instructions:
Heat oven to 325F.


Grease 2 loaf pans. I use spray coconut oil

In a medium bowl, combine flour, baking powder, soda, salt, and spice; set aside.


Using a stand mixer with the paddle attachment cream the butter and sugars until light and fluffy. Keep beating until the sucanat is dissolved and the mixture is really fluffy.


Beat in eggs, one at a time, beating well after each addition. When all eggs have been added, the mixture will be quite fluffy.


Beat in pumpkin and vanilla.


Slowly add dry ingredients, a little at a time, just until combined.

Spoon into the prepared loaf pans and bake for 55 to 60 minutes (but watch and see as every oven is different), or until a toothpick comes out clean when inserted in center.


Cool for 15 minutes in the pan, then run a knife around the edge of the pan to separate the loaf from the pan. Invert the pan onto a wire rack to cool completely. While it's cooling you can whip up the spiced honey butter.


Spiced Honey Butter 


1/3 - 1/2 cup butter (for vegan, use Earth Balance spread)
1/4 cup raw honey 
1/2 teaspoon cinnamon
Scant 1/8 teaspoon ginger
Scant 1/8 teaspoon Allspice
1/4 teaspoon nutmeg

Warm the butter and the honey until they can easily be combined. Add in the spices and mix to combine. Pour into a ramekin and put into the refrigerator to solidify. 

Cut bread and serve with a spread of the honey butter on it. It is really good! 


This butter would make a fantastic gift by itself. Combine it with a small loaf of pumpkin bread and you are ready with a hostess gift for any Autumn event you attend.


I hope you enjoy fall as much as I do! 
Laureen