Friday, January 31, 2014

Raw Food Cookies Truffles

Eight years ago I had a really scary diagnosis. Doctors told me I was just under the levels for multiple myeloma, a bone marrow and blood cancer. I was sent off to a hematology oncologist with instructions to not worry. HA!

So long story short, this diagnosis started my trek to become more healthy. I cut out man-made chemicals from my life as much as possible, and I started eating organic foods. Since that time I have taken many supplements, worked many detox programs, and I continue to change my eating habits.

I have made it 8 years without progressing to cancer. No chemo or bone marrow transplants for me!

What I have found works best is to change one thing at a time. Just keep making one more thing healthier in your life. We know white sugar is no good, so try honey, evaporated cane juice, sucanat, or coconut sugar. Then work on replacing the flour you use with healthier ones. Buy unbleached flour, then add in half oat flour, or try some almond flour.

Through using this method of making every recipe just one step healthier, I am finding I can have all sorts of yummy things and give my body nutrients at the same time! The possibilities are endless!
 

Recently, my husband also had some health issues. We went to a Naturopath and we got instructions for further refining our diets. With this new list of foods in mind, I created a new Raw Food treat that tastes so good, like a truffle, and is packed with nutrients. Not a bad ingredient in it! 

Raw Food Cookie Truffles

1/2 cup raw almonds
1/2 cup raw walnuts 
1/2 cup almond flour
1/2 teaspoons ground cinnamon 
1/8 teaspoons sea salt 
1 packet Stevia

1-3 Tablespoons hemp, coconut, or almond milk
1 1/2 teaspoons pure vanilla extract


Optional Additions:
3 Tablespoons raw cacao

3 Tablespoons chia seeds
1/4 teaspoons nutmeg


Instructions
  1. In a food processor, process the almonds, walnuts, and almond flour until the oil starts to come out of the nuts. It will be grainy but should look like it is well on it's way to becoming a nut butter.
  2. Add the cinnamon salt, Stevia, milk, and vanilla. Process to combine.
  3. Taste the "dough." If it is not sweet enough for you add a little more Stevia.
  4. Next, add the optional ingredients and pulse just to combine. Taste again. Adjust flavors. My raw cocoa is very bitter and sometimes I need to add a little more sweetener.
  5. Roll the cookie dough into balls about 1 tbsp each and place them in a tightly covered container. You can freeze them to make them more firm but they do not need to be refrigerated. 
These truffle cookies are excellent to bring with you when traveling. They have all sorts of healthy proteins and fats in them. They also taste like you are eating something you shouldn't be eating. Hope you enjoy them as much as I do. 


Happy Healthy 2014,
Laureen

Wednesday, January 29, 2014

Adorable Elise and her Organic Potato

I am a huge believer in organic products. We should not be eating the things that have been approved by our regulatory groups. 

Elise is a 3rd Grade student who decided to grow a potato for her science project. Sound reasonable, right? Elise discovered that she needed to purchase organic potatoes for her experiment to work. I will let her tell you the rest. 


Since a picture is worth a thousand words, enough said.

Tuesday, January 28, 2014

DIY Healthy Food - Marmalade Chicken

Chicken. It can be so boring if you let it. When I first met my husband he used to brag that he ate boiled chicken. Yuck. 

I didn't understand why he thought that was a good thing when you can add in some flavorings and make it just as healthy. 

We have a recipe for Orange Marmalade Chicken that we found on the Canyon Rance Recipes only we don't really follow the recipe. Remember to use organic ingredients!


Marmalade Chicken

4 4-oz boneless, skinless chicken breast halves
¼ tsp sea salt
¼ tsp freshly ground black pepper
2 tsp extra-virgin olive oil


Season chicken breasts with salt and pepper and sear in olive oil over medium-high heat for 1 minute on each side. 

Transfer chicken breast to a baking dish and add vegetable stock and Bragg's Amino Acids or a tamari sauce until the bottom of the pan is covered. 


Marmalade Sauce

¼ cup organic orange marmalade
½ Tbsp fresh lemon juice


Mix marmalade and lemon juice together and spoon onto chicken breasts.  

Cook in oven at 350' for 15 to 20 minutes, or until done.

The saltiness of the stock and the Amino Acids compliment the sweetness of the marmalade perfectly.

We created a tempe stirfry on the side and the meal was fabulous!

Jalapeno Chicken Recipe
(Since you know I can't leave a recipe alone)

I made a jalapeno jelly during the holidays and we recently used that instead of the orange marmalade. Oh my gosh! It was sooooo good! Jalapeno Jelly recipe coming soon.

Happy Healthy 2014!
Laureen

Sunday, January 26, 2014

Creative Centerpieces

So I am just going to spit it out: I am tired of giant balls of roses on thin vases at weddings. There. I've said it and there is no taking it back. 

I like creative centerpieces, something different, unexpected, but fitting to the event. 

Throw in some unusual flowers, unexpected "vases" and some original designs. 


For example, we threw my Mom a tea party for her birthday one year. Most people would put flowers in tea pots. And while that is perfectly lovely, it just lacks imagination. I put them into vintage purses and had a matching hat with each. 


This could be really cute at a garden party or vintage themed wedding too. 


For my Halloween Party this year, I made real flowers bleed. I made up some fake blood and had it drip from the upper flowers into a bowl with a pure white lisianthus. 


Let's get creative!


For my niece's wedding, we used antique brass candlesticks for the base of the flowers.


She also requested no roses, daisies, carnations, tulips, or orchids. Brilliant! Something unique and challenging. I loved it! 


A good centerpiece should use the following criteria:
  • Must not block the conversation or the view of the person across the table. 
  • Must be creative and unusual. 
  • Must not block the conversation or the view of the person across the table.
  • Should coordinate with the theme, colors, and style of the event. 
  • Must not block the conversation or the view of the person across the table.

Can you guess which is most important to me? While many of the centerpieces I see in pictures are perfectly lovely, there is no way to see around them. You have immediately stifled the conversation of the table and dropped the level of energy at your party. The only time this is okay is when you KNOW you are sitting people at the same table that do not like each other and you are preventing a fight--better yet, change the seating! 

So whether you are planning your Easter table or your wedding, make sure you have something that speaks of you. Something different that guests will remember. And something that helps the guests interract. 

Let's party!
Laureen 

Thursday, January 23, 2014

Homemade Healthy Coffee Creamers - Easy and SOOOO Good!

I love coffee in the morning. Every morning. Especially after the alarm has gone off waaaay too early. See, I'm not a morning person. I try to be. I have been working at it for many years but no luck. Every time I get some time off I end up staying up late and sleeping in. It's just part of my body's natural rhythm. 

But duty calls. Work meetings often start at 7 AM so I have to be up and starting my day by 5:30 or 6:00 AM. Coffee is my saving grace at that point. 

I started drinking coffee with those flavored creamers. They made the coffee sweet and took away the bitterness. I have quite the sweet tooth so this was a yummy way to start my morning. 

As I have moved to healthier eating, I kept drinking creamers for a while since I figured I wasn't ingesting too much of them each day. However, I then realized what I was doing. I had cleaned up my diet but was ingesting chemicals, and things that cause cell inflammation, first thing in the morning and essentially starting my day in the worst possible way. 

It was time to make my own. 

I also found cacao. Ooooh. I am spoiled. I mean really spoiled. I have a friend that lives in Guatemala and has found someone who harvests WILD cacao beans, processes them as little as possible, and creates bricks of the best cacao in the world. I love this stuff. I add it to my coffee every chance I get. 

I also found raw honey and other things that make my coffee taste fabulous and make my body feel good. By the way, if you use the raw honey recommended below, take a spoonful and eat it every morning along with putting one in your coffee. 


Coffee "Creamer"

1/2 cup almond, coconut, or hemp milk, unsweetened and unflavored
2 Tablespoons Raw Honey
(adjust to taste)

3-4 Tablespoons raw cacao (adjust to taste)
1/2 teaspoon cinnamon, nutmeg or any spice you like (adjust to taste)

Add the milk, honey, and cacao to a double boiler. Heat gently until the honey and cacao are melted. Remove from heat and sprinkle in cinnamon and other spices of your choosing. Pour into a pitcher and viola! Homemade Creamer. This will last for a few days, depending on how much coffee you drink and how much creamer you use. 

 
I found these cool little Mini Glass Creamer bottles at Crate and Barrel that are now on sale for 50 cents! They are not only cute--adorable even!--but I can easily carry them to work with me so I don't have to use the creamers provided at work.


Variations:
  • Amaretto Creamer:  Add a teaspoon of almond extract to the milk instead of the cinnamon and omit the cacao for almond or amaretto flavoring. 
  • Vanilla Creamer:  Omit the cacao and add a teaspoon of vanilla extract or vanilla bean (split, insides removed, and all added to the pot with the milk). Steep the vanilla bean for at least a half hour. Strain the mixture before you put it into the pitcher. 
  • Almond "Joy": Use coconut milk, 1/2 teaspoon almond extract and 1/2 teaspoon coconut extract. You can keep the cacao or leave it out depending on your mood. 

Can you see where these recipes are going? Just add in whatever flavors you love. Keep the ingredients all organic and as unprocessed as possible. If you can't figure out the ingredients for a certain flavor favorite, post a comment and I will help. 

Now, it's time for my morning joe! Ahhhhh

Happy Sipping!
Laureen 

Saturday, January 18, 2014

5 Secrets of Wedding Planning

Yea! You're Engaged! This should be such a fun and happy time! But I keep reading articles that tell you to not run out and buy your dress, to spend no more than 20% on this or that, blah blah blah. Hey, it's your wedding, do what you want!--within reason. 

I wrote a post about a year ago about laying the foundation for any event, and it holds true especially for something big like a wedding. Having this information will help keep you sane when all your vendors, friends, and family give you well-meaning advice and confuse the heck out of you. 

Now it's time I let you in on a few secrets to making your planning go more smoothly. To have a successful wedding, here are 5 things for you to know: 

  1. This is the biggest secret to wedding planning: there are no standards. Yep, I said it. I let the cat out of the bag. There will be a few hundred weddings in your city on the same day you get married and each one will be different. If you are a fan of flowers, you can spend half your budget there. If you love music, you can spend your money there. If you have always dreamed of a certain dress, you guessed it, you can splurge there. There is no secret to budgeting or planning a wedding. You have a certain amount of money to spend and you can divide it up any way you like.
  2. First, book the things and people that can only work one wedding at a time. That includes the venue, person performing the ceremony, musicians, hair stylist, make up artists, photographers, and possibly caterers.

    Makes sense right? If there are 500 weddings occurring in your city on the same day, you will want to make sure you get the vendors you like. Bakers, printers, and florists (and sometimes caterers) can do multiple weddings at a time so you can book them a little later.


  3. Spend your money on what is important to you and focus your energy on booking the best. To me, pictures were important because that was what I had left when the wedding was over. Also, my father had just had a heart attack and I wanted a lot of family pictures. My picture and video costs were 50% of my budget. I wore my mother's dress and held the reception at my house to save money in other areas so I could splurge on pictures. And I hired the best photographer and videographer I could find.
  4. If you are DIYing, DIY early and plan to do a test run. You can DIY most of your wedding if you plan in advance and enlist your creative friends and family. If you are going to DIY anything, do it early. I can't stress this enough. Also, do a test run. I did my niece's flowers and tested designs with her at her shower first so she could choose what she liked.

    Test runs are especially important if you have never seen the work of the person before or if you need to make sure something comes out before you do it for your wedding day. If you realize something doesn't work, be willing to change. Even if that means telling Aunt Marion she can't make the cake on your big day.
  5. Right before the wedding, people get weird. Friends may become jealous that you are getting married, siblings can become envious of the attention you are getting, and other people just start behaving oddly. This occurs at one of the most stressful times in your life. Try your best to not take it personally and remember their feelings are really not about you. Sometimes no matter how much others try to put you first and be happy for you, their inner turmoil bubbles to the surface. Don't let it ruin your big day.

Just remember these secrets as you plan your big day and you will have a happy wedding! 

To your happiness!
Laureen


Monday, January 13, 2014

DIY Weddings - Recommendations from Brides who have been there!

I firmly believe our weddings are some of the most amazing events we put on in our lives. Not only are they a great party, but they are truly a celebration of love. There just aren't many times in our lives when we invite people in to celebrate nothing but love. 

I also believe we can have amazing weddings, to celebrate love, without breaking the bank or going into debt for years. There are many paths to take to do this. Know what you can do yourself and know your limitations. A DIY Wedding can take on many forms.

Two of my nieces were married last year. Both weddings were incredibly beautiful and very different. One was at a gorgeous golf resort in Baltimore, MD, and the other was in an incredible redwood forest in Santa Cruz, CA. The golf resort wedding had a few DIY elements, and the redwood forest wedding was primarily DIY.  I asked them what they would do again, and what they wouldn't. Along with my own experiences, these are the top 5 thoughts on where to spend your money on your big day. 
  1. I opted to not make my own favors. I would recommend this for any DIY wedding with over 50 guests since it's a lot of work. I had researched buying bulk mason jars and fresh fruit but it was actually pretty expensive. I just found a seller on Etsy who did her own homemade jams with custom labels for less than what I would have paid doing it on my own. Sometimes it is cheaper to not DIY!
  2. Hire a day-of coordinator or ask a friend in the industry (what I did). I just told her how I wanted the whole dining room set for the reception and she made it happen with the staff. She handled it all while I was getting ready for the day with hair, makeup, and photos. This requires the bride to set out the place setting beforehand and know how she wants the tables to look so you can clearly communicate your vision to the coordinator. 

  3. Dessert/cake: I had initially thought I would make a bunch of homemade pies for dessert. We instead found a great local bakery and ordered everything from them for less than $300. Totally worth it in my opinion since we were entertaining family for a week prior to the wedding and wouldn't have had time...not to mention I have 1 single oven. Review your schedule 1 week prior to the wedding and see where you want to spend your time. Do you want to relax and be pampered, or entertain out of town guests? Or do you want to spend the time in your kitchen baking pies and cakes. And then, where do you store them so they won't go bad?

  4. Flowers: I did the flowers for my niece's wedding and I would not do them as a bride. Even if I were going to get married again or renew my vows I would not create my own flower arrangements. While some brides think it seems to be no big deal, it takes a lot of time. For my niece's wedding I was up at 1 AM the day before the wedding to get to the flower market so I could choose the flowers we wanted (and I was shopping at the San Francisco Flower Mart--one of the largest floral wholesale markets in the US!). The Mart opens at 2 AM and when I had checked it on Wednesday at about 10AM the only thing left were greens and wilted flowers. The vendors with the good flowers don't show up on Tuesdays or Thursdays, requiring me to go Friday morning. I then spent all day making centerpieces, bouquets, boutonnieres, corsages, and arrangements for the buffet tables and ceremony aisle. It was a lot of fun for me to do because I love doing flowers, I wasn't in the wedding, and was not the bride. The flowers ended up costing $600 for materials.
  5. Making your own food is too chaotic. Even if you are a gourmet chef you will not want to be up at the crack of dawn on your wedding day to make food. Nor do you want to be up late the night before chopping vegetables. I have watched brides try to save money by creating their own vegetable plates or a portion of the meals. Unless you are ultra prepared (so that everything else for the wedding is done), don't try to prepare your own food for the reception. Vegetable platters are less than $20 at CostCo. 


    Remember that your sanity is important before your wedding. You want to be coherent and aware of how the beauty of your day is unfolding. Don't overwhelm yourself. There are plenty of ways to DIY your wedding without taking on too much.

    Enjoy!
    Laureen


Sunday, January 5, 2014

All the Comforts of Home

I will be traveling for business more this year. I have a love/hate relationship with business travel. I really like being at home. I can have everything my way.

And since I have been adding more healthy items to my diet, it makes it more difficult to eat the way I like while on the road. 

I like having my homemade coffee "creamer"; I like drinking my lemon, apple cider vinegar, and aloe gel in sparkling water at night. I miss those things when I travel. 

As I will be traveling more, I wanted to bring home with me. So I don't have to miss the things that make me feel good every day. 

 
I found this cool little Mini Glass Creamer bottles at Crate and Barrel that are now on sale for 50 cents! They are not only cute--adorable even!--but I think they can give me a bit of home in an easy to carry container.

I have put my lemon juice/apple cider vinegar/aloe juice concoction into one. I am freezing that to keep the ingredients chilled while I travel. And I have added some raw honey, cinnamon, and raw cacoa to another to use as my creamer! I will let you know how they work out when I return. 

Although this probably guarantees I will have my luggage searched by TSA agents, I still think it's worth it. Remind me to tell you about my travels when I used to bring a bag of epsom salts with me! HA! I finally learned to keep them in the original bag.  

Here's to hoping I don't end up with luggage full of honey and my clothes don't end up smelling like apple cider vinegar. I will update this blog post when I return to let you know how it went.


Post trip update---the bottles worked amazingly well! No leakage! My luggage was searched by TSA but I was not surprised by that. I had put ingredients lists on each one, put them in small plastic bags, then put both bottles into a larger plastic bag with a couple of paper towels, just in case. The towels were dry when I got there. After defrosting and using, one of the lids cracked so I need to determine a better lid for the containers but this idea is a go. I will never travel without my concoctions again.


Happy Travels and #happyhealthy2014!
Laureen


Saturday, January 4, 2014

Flu Fighting Tea - DIY and Organic!

I get sore throats a lot. Not just from viruses but also from talking a lot. Have I mentioned that I talk a lot? 

I recently found a great recipe on Pinterest that I have made. It makes the most soothing tea! I am also detoxing my body this year so my stomach has been upset. This also includes stuff to calm the stomach. The tea is relaxing, soothing, and smells like heaven. 


One of my sisters (I have 6) swears by gargling with alcohol (brandy, cognac, etc.) to cure a sore throat. So if you are a believer in alcohol killing all germs, feel free to do this before you drink your tea. Or add it into your tea. Everybody is different and you need to use what works for you.

You can find this recipe all over Pinterest but I will add it below too. Below the recipe I will add in additional things you can add to your tea and how they benefit your body. 


Flu Fighting Tea 

1 organic lemon
1" piece of fresh ginger
1 Cup Raw Honey-pourable

Container to put it all in. 


Slice the lemon into thin slices then cut them into pieces that will fit into your container.

Peel the ginger and use either the peeler or a knife to cut small small pieces of ginger. Fresh ginger can be quite strong so chop more finely than the lemons. Add the ginger to the container.

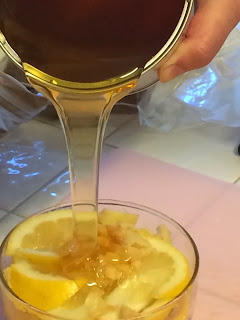
Pour the raw honey over the lemons and ginger. Use the knife to make sure the honey is seeping into all the crevices and filling the container. I fill the container with honey, but leave a 1/2" gap at the top because when the lemon juice mixes with the honey the whole mixture expands a little. 

Cover tightly and set aside. The lemon juice will be pulled out of the lemons and mix with the honey. The ginger essence will also mix into the honey making one of the most yummy concoctions. 

Eventually the lemon, including the rind, will break down in the honey and create a jelly looking mixture. 

To use: put a tablespoon or 2 into a cup and add hot, not boiling, water. Stir and enjoy. You can breathe in the scents and it will help soothe sinuses. Then sip the tea.


Ingredient benefits and additions:

Raw Honey Benefits
Lemon Benefits
Ginger Benefits

Additions:
Sprinkle any of these into your tea to add additional flavors and benefits. 

Cinnamon Benefits
Cayenne Benefits  (if your stomach is upset, don't use this one).
Alcohol (drinking too much will compromise your immune system--everything in moderation)

Here's to a #HealthyHappy2014!
Laureen