Saturday, December 28, 2013

DIY Healthy Beauty Products! All homemade!

This Christmas, my family and I agreed to make things for each other. I went through old recipes, thinking Pumpkin bread, flavored vodkas, or spice combinations. Last year I made fresh bread with  blueberry, red wine compote, and jalapeno jelly honey butter. They were yummy! 

I wanted to do something new this year. Something I hadn't tried before. I figured worst case scenario, I could fall back on flavored vodkas and olive oils. 

So I decided on skin products and lip balm. I use organic ingredients so they are high quality products. I made a lip balm, antibacterial hand cream, and soothing skin salve. 

 The lip balm was included shea butter, sunflower oil, cocoa butter, peppermint extract, raw honey, and a little bees wax. The raw honey doesn't mix well with the oils so I might omit it next time. If you want to include the honey, add just a little. I have to admit that it does make the lip balm taste really good. And this stuff stays on your lips for hours! That is, if you don't lick off the honey. Click here for the recipe.


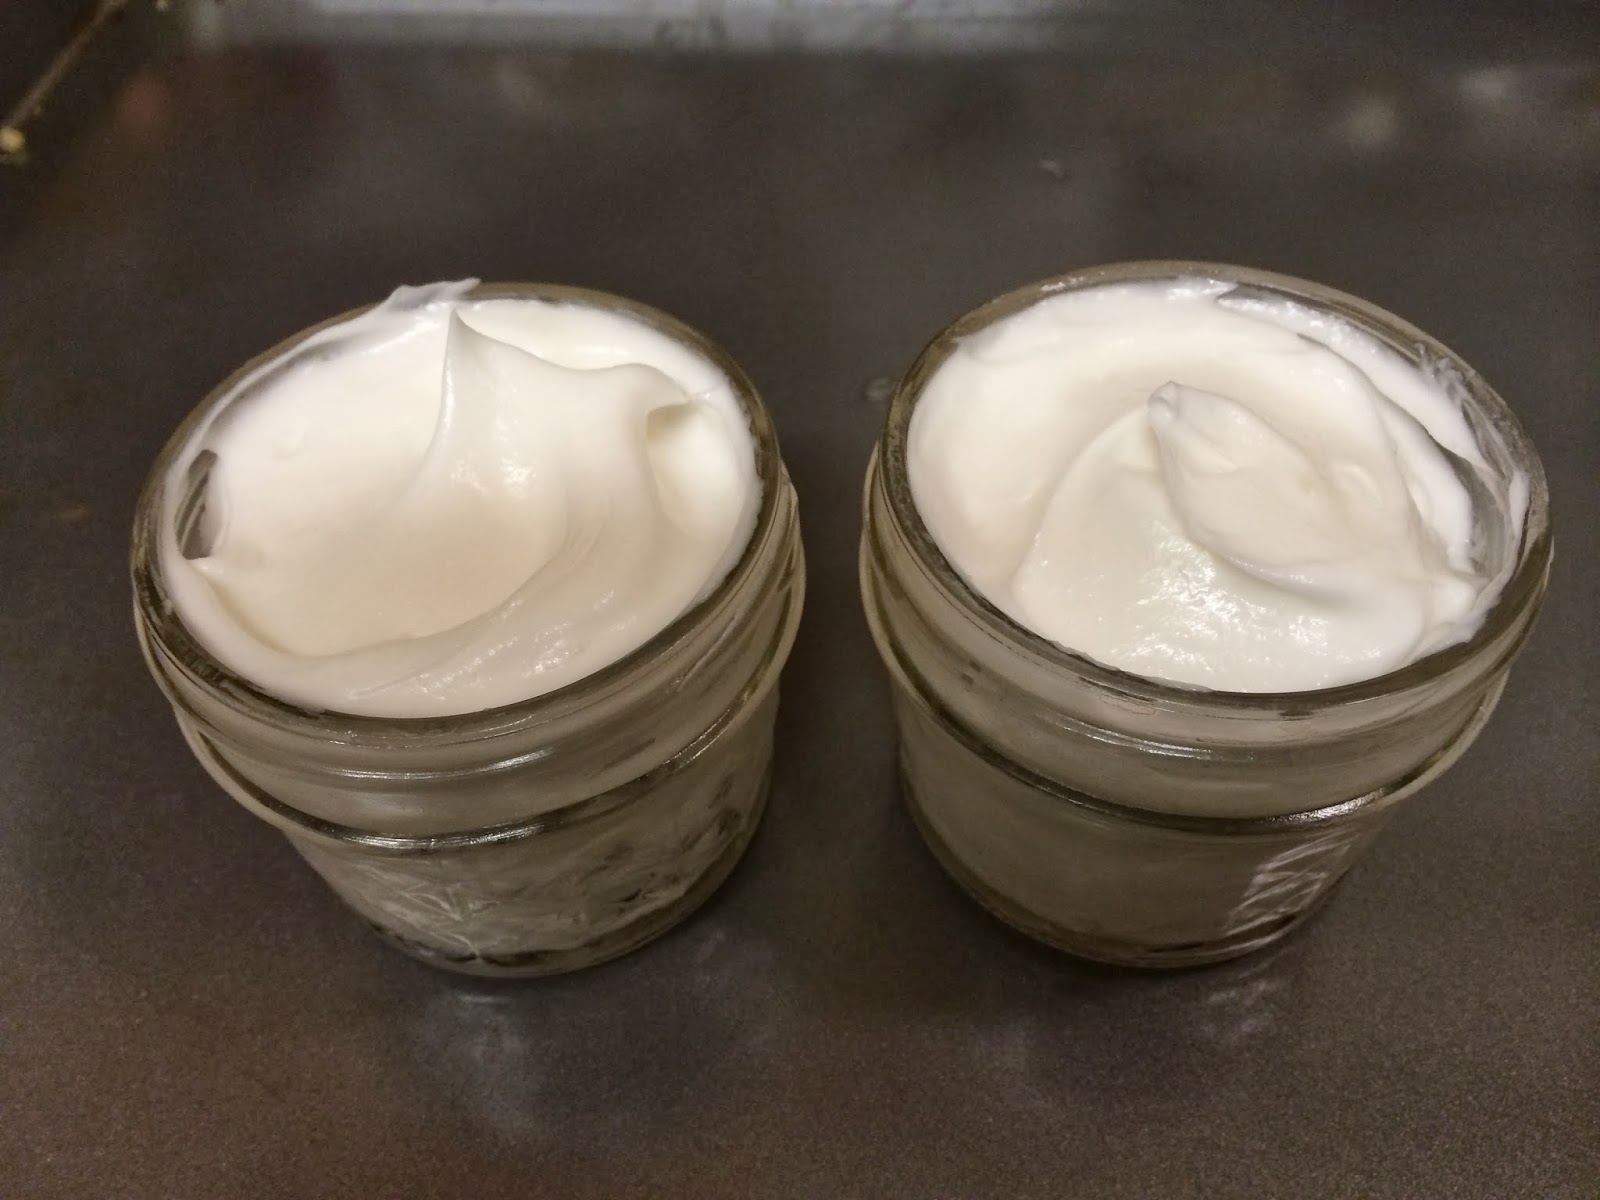
The natural antibacterial moisturizing lotion was a bit of a cheat in that it started with lotion. I added in vitamin E, coconut oil, eucalyptus essential oil--which is the natural antibacterial, and almond oil. This one needs a mixer so you can whip it together. At first I didn't whip it and the coconut oil didn't mix well with the lotion. 

I scooped the product back out of the containers and whipped the ingredients and it came out looking like it does in the picture...fabulous!

The final healing salve is made of olive oil, coconut oil, vitamin E oil, bees wax, lemon essential oil, orange essential oil, tea tree oil, and a little lavender essential oil.

This one is my favorite. It is fabulous for dry skin. It stays on the skin and is absorbed slowly so don't touch anything for a while until it soaks in. But it also works better than pure shea butter to soften and soothe skin. 

You can find many recipes for these items on Pinterest but I will post my recipes here soon. I plan to continue to work on them to pack in as many healthy and healing ingredients as possible into future versions. 

To a Healthy, Happy New Year! 
Laureen


On Sale Now at The Knot Wedding Shop

Thursday, December 19, 2013

Rum Cake Donut Muffins... YUM!

I have been trying to think of things to make this Christmas. I like to play with recipes and make things yummier and healthier. 

Someone I used to work with made Rum Balls every year. They were so good and made everyone at work so happy. 

But I also love muffins. Especially muffins that taste like donuts. Donut Muffins. Mmmmmm

And then there is eggnog. You have to have eggnog this time of year. But I am not a huge fan of drinking it. I love the idea of eggnog and the flavor but I don't like drinking thick cream, even if it is the yummy goodness of eggnog. 

So I mixed them all together and made a really yummy, really moist, Donut Muffin Rum Ball. Rum Ball Muffin? Mini Rum Cake? 

Whatever you want to call them, they are fabulous! Use a mini muffin pan. I recommend the Wilton one.  Use a little coconut spray to oil the pan and the muffins fall right out.


Rum Cake Doughnut Muffins (makes 32)
1 cup organic unbleached white flour
¾ cup oat flour
1-½ teaspoon baking powder
½ teaspoon salt
½ teaspoon nutmeg
¾ teaspoon cinnamon


⅓ cup coconut oil
¾ cup organic evaporated cane juice (organic sugar)
1 egg
½ cup eggnog (or coconut, almond, cow milk)
1/4 cup rum

Preheat the oven to 350ยบ. Whisk together the flour, baking powder, salt, nutmeg, and cinnamon.

In a separate bowl, add coconut oil, sugar, egg, and eggnog. Mix to combine. Add the rum and mix again until thoroughly blended.

Add dry ingredients to wet ingredients and stir only to combine.

Coat your muffin pan with a little coconut oil cooking spray and scoop the batter evenly among the cups. I filled a 24 muffin tin and had enough for another 8.

Bake at 350 degrees for 8-12 minutes. Tops should be lightly browned and muffin should spring back when you lightly touch the top.

Let the muffins cool for about 10 minutes in the pan. Remove from pan and allow them to cool another half hour or so. 

Turn the Doughnut Muffin into a Rum Cake Ball

Ingredients:
1/2 cup light rum
3 cups powdered sugar

Pour the rum into a bowl and the powdered sugar into a bag. Quickly roll the muffins in the rum and then drop into the bag of sugar. You can do about 5 at a time in the sugar. Seal the bag and shake or roll the muffins and sugar around in the bag to coat. 

Tap off the excess powdered sugar and you are ready to eat! 

Tip and warning: These muffins can soak up a LOT of rum! They are like little sponges. I recommend you coat one muffin and taste it. I know, it's a tough task but someone has to do it! The first ones I made were really strong. Too strong. Even my husband said so. So I rolled them in the rum much faster for the remaining muffins so they wouldn't soak up so much rum.

I put some in cute little holiday ramekins for gifts for my co-workers and I left the remaining in the bag of powdered sugar for us at home.

These are the best, yummy, rum-cake-ball-donut-muffins! I dare you to try to eat just one! 

Another warning: Writing blog entries while eating powdered sugar covered Rum Cake Donut Muffins will make your keyboard a sweet, sticky, mess. 

Enjoy!
Laureen 

Saturday, December 14, 2013

Eggnog Yogurt Breakfast - Incredibly yummy, healthy, and easy!

I love the idea of eggnog. That sweet creamy texture, the addition of spices. It is so darn yummy. Yet it goes bad so fast if you get the good stuff! I am not a big milk drinker so that is why I say I love the idea of eggnog.

I found a way to have my eggnog and eat healthy too. On a day when I wanted something different for breakfast, I mixed it into my vanilla yogurt and OH MY GOODNESS!  

I like to add some granola and my husband bought me a new flavor he found: Salted Chocolate Granola! WHAT? REALLY?! Oh yum. When I first made this concoction, I used a cranberry nut granola and it was good, but the Salted Chocolate? HOLY COW! 

So here is what you will need: 

  • 3/4 to 1 Cup of a good organic vanilla yogurt. I usually have coconut yogurt but they were out so I got a cows' milk yogurt. 
  • 1/4 Cup of a really good eggnog. I prefer Straus Family Creamery but if you have a local creamery, try them! 
  • 1/8 - 1/4 Cup granola. Homemade is best but I don't always have time and I love Cocomo Joes. And the Salty Chocolate flavor can't be beat. 
  • Cinnamon to taste.
  • Nutmeg to taste.
Put all ingredients into a nice bowl and stir. I like to let mine sit for about 5 minutes so the granola softens a little but if you like yours really crunchy, enjoy immediately. 


Tuesday, December 10, 2013

Deck those halls!

Today only: Special discount code for One Kings Lane. 
Offer: 20% Off at One Kings Lane

Sometimes things like this come around so rarely that when they do, you have to share. 

Thursday, November 28, 2013

Happy Thanksgiving!

I hope you have a wonderful Thanksgiving filled with beauty and all good things! 


Sunday, November 24, 2013

Cream Cheese Cinnamon Rolls with Cream Cheese Icing -- Need I say more?

Mmmmmm. The smell of hot cinnamon rolls. Nothing quite like it. The other day my husband came home from the mall and said he wanted cinnamon rolls. 

This is quite startling because he is not a sweets person. He loves crunchy salty stuff. 

Of course I jumped on this chance to make them. What better reason? He asked for them! HA! I will use any reason to bake something yummy like cinnamon rolls. 


Yeast, the Bane of my Existence

Those of you that have read my blog from the beginning know that yeast doesn't like me. For the life of me, I cannot make it activate on my own no matter what I do. I have used thermometers to make sure the temperature is right, sugar, scalded milk, heated milk, water, etc. Nothing works for me. I even had my Mom try to help me to no avail. 

I have given up and purchased a bread machine. I use it to make my sweet bread. If, however, yeast likes you, you can use any sweet bread recipe. Here is a good one. You can substitute some spelt flour for half of the white and sucanut instead of the sugar. Use your favorite healthy substitutes. 

When you start to make your dough, pull a stick of butter or tub container and n 8 oz package of cream cheese out of the refrigerator so they can come to room temperature. 

Cream Cheese Cinnamon Rolls with Cream Cheese Frosting

  • 1 Batch sweet dough
  • 1/2 Stick butter (you might not use the whole thing)
  • 1 8oz package cream cheese (or lower fat Neufchรขtel) divided
  • 1/2 - 3/4 Cup brown sugar or sucanat
  • 2-4 Tablespoons cinnamon
  • 1 Cup Powdered Sugar
  • 2 Tablespoons Milk
  • 1 teaspoon almond or vanilla extract

After the dough has finished it's first rise, punch it down and roll it out. I wipe my counter off and while it's damp cover with 2 large pieces of saran wrap. The moisture makes the wrap stick to the counter top and the wrap makes cleanup so much easier. You can dust the surface with a little flour if the dough seems sticky. Otherwise, just roll until the dough is in a rectangle, about 10" x 18".  


Filling

Use the room temperature butter and spread butter on the rolled out dough. It
doesn't need to be consistent or evenly spread. Just don't leave large un-buttered spots as those will be drier when they cook. 

Cut small chunks of cream cheese (about a teaspoon) and drop the chunks onto the dough. See the picture for what it will look like. I used about 3 ounces of cream cheese in the filling. The rest is used to make the frosting.

After you have dropped dollops of cream cheese all over the rolled out dough it's time to sprinkle the brown sugar or sucanat. Cover the entire surface of the dough all the way to the edges. If you like your cinnamon rolls sweet, use 3/4 cup. If you like them less sweet, use 1/2 cup.


Sprinkle the cinnamon over the brown sugar or sucanat all the way to the edges. If you like cinnamon, use 3 or 4 Tablespoons. If you like less cinnamon flavor, use 2 Tablespoons. If you aren't sure, start with 3 Tablespoons and adjust the recipe the next time you make them. 


Roll it up

Start on the long end and roll it up. If you start on a short end you will have fewer but fatter rolls. Just start slowly and keep the roll even. When you get it to the end, pinch the dough so that the end seals to the roll. You are ready to cut it. 

Use a serrated knife and cut the end off. The end will be oddly shaped but don't worry about that. It will still taste good. If you are using these for a party, consider the ends your tasters. 

Slice the rolls about ever 1 1/2 inches and gently place them in a greased pan. I used a 9" x 13" pan. Leave space between the rolls so that they can rise. 

When you cut the rolls you can see the white chunks of cream cheese. YUM.

Put the pan of rolls in a warm place to rise for about 45 minutes. I used my oven. I turned it on to warm for just a couple of minutes while I sliced the rolls then turned it off and put the rolls in. You don't want it too hot (if the oven feels hot when you open the door, it's too hot). 

After about 45 minutes, your rolls will double in size and fill the pan.

Pull the pan out of the oven and turn the oven on to preheat. Set the heat at 350'. 


When you oven is preheated, pop the pan into the oven and cook for 20 minutes or until light golden brown on the top. If you tap on the top of a roll, it should sound a little hollow. 


Cream Cheese Frosting

Put the remainder of the cream cheese in a bowl. Add in 2/3 of the powdered sugar and stir. If the frosting gets too thick, add in a tablespoon of milk. If it is thin or not sweet enough, add in more powdered sugar. Beat until all ingredients are combined. Add in a teaspoon of either almond extract or vanilla extract depending on your preference. 


Your rolls should now be cool enough to frost. My husband doesn't like frosting (I know! More for me!) so I frosted them as I plated mine and left the pan unfrosted. You can see I mixed my frosting in a bowl with lid for easy storage. If you have leftover frosting or are not frosting the whole pan, store the frosting in the refrigerator.  


Hope you enjoy cinnamon rolls as much as I do. Time for me to have a snack! 

Laureen

Saturday, November 16, 2013

Feathered Thanksgiving Wreath - SUPER EASY!

This year with Thanksgiving being so late I wanted to create decorations that I can easily change out to Christmas decorations.

The wreath I made for Halloween was so easy that I decided to make something similar.

Feather wreaths are so darn easy to make. And they last amazingly well in weather. Mine is lasting through wind storms, rain, and sun. My front door is a bit protected by a porch but I am amazed at how well it holds together.


You need 4 items:
  • Styrofoam wreath form
  • White Feather Boas (I bought 3)
  • Upholstery pins 
  • Wired ribbon of your choice
I purchased the wreath forms and feather boas at Save On Crafts. If you have never been to this website, you are in for a treat. This site is packed with everything you need to create any craft, and the prices are fantastic.

Start by pinning an end of the wreath into the styrofoam form. Wrap the boa around the form until you run out of boa. 

Overlap the end of the second boa with the end of the first boa on the form and pin it. 

Wrap the second boa and repeat the process with the third boa until the wreath form is covered. Pin the final end. 

I find it easiest to tie a bow if the ribbon is first tied around the wreath. I tied  the ribbon  around the top of the wreath, then tied a bow. I chose a copper colored ribbon for Thanksgiving. I plan to change it out and add Christmas balls to it after Thanksgiving is over. 

But for now, I have my Thanksgiving wreath that makes me smile each time I approach my front door.

Celebrate Thanksgiving with easy decorations that make an impact.

Happy Thanksgiving! 
Laureen

Setting a Buffet for Ease of Use


I am one of those people that always looks for an easier way to do things. I hate inconvenience and try to be as efficient as possible. Really what it boils down to is that I am lazy. 

I have recently found that a mild irritation of mine is quickly turning into a pet peeve by attending events with buffets. 

Don't get me wrong, I love a good buffet. I like being able to choose what I eat and how much, however most places, including many caterers and restaurants, set things out so that it is very inconvenient for the guests as in the picture above.  So what is wrong with this picture? 

Can you see it? 

All the plates, utensils and napkins are at the front of the line. Guests need to carry their utensils and napkins with them as they maneuver the line for food. It makes no sense. 

Do you really want guests using their utensils as they walk down the line of platters? No! Ewww! Ick! 

Put them at the other end! Allow the guests to pick up their plate, walk down the buffet line choosing whatever sumptuous things you have provided for them. Then when they have made their selections allow them to pick up utensils and napkins. Guests will know which utensils they need at this point and won't grab a knife or spoon if they don't need it.

It makes so much sense! I know, right? Why didn't we think of this years and years ago? 

Well actually, someone in my family did think of it years and years ago and now all of our holiday buffets are set up this way. And I now set up every buffet this way. 

I hope you also find this tip works for you! Let me know what other things you do when entertaining to make it easier on your guests! 

Let's Eat! 
Laureen

Gifts of YUM

I love getting together with people during the fall. It seems like the best time of year to gather with friends and have good food and drinks. This season, for me, the parties are already beginning. 

As an aside, I have had folks ask me where I purchase the items I use for the things I make so I am going to include links to items that I love. I hope this makes it easier for you to duplicate the items you see here.
 
When I am invited to a get together at someone's home, I like to bring them a little something that they can enjoy the next morning. We all know what it feels like to get up the morning after you have hosted a party. There are dishes to be done, floors to clean, and you really aren't in the mood to cook yourself something good. 


For the first parties of the season, my hostess gift is Mini Pumpkin Muffins with Spiced Honey Butter.

I posted the recipe a couple of weeks back: Taste of the Season-Pumpkin Bread and Spiced Honey Butter. I used the same recipe that I made in the post linked above but scooped the batter into my new mini-muffin pan instead.


Wilton 24 Cup Mini Muffin Pan - Black
Find bakeware and ovenware at Target.com! Prepare delicious mini treats with the wilton... [More]
Price: 12.19

This pan is so easy to use and to clean! I spritzed it with a bit of coconut oil cooking spray to grease the pan and when I was done cooking, the residual spray washed off with water! There was no sticky yellowish mess that you get with other pans. Needless to say, I was thrilled. Anything that allows me to clean up more quickly is great and I will be sure to share it. 

So back to the cooking. The recipe for the pumpkin bread will make 2 and a half pans of mini muffins so you will have plenty for your breakfast too. If you prefer, you can divide the batter and make one mini-muffin pan and a bundt cake, loaf, or 3 mini-loafs out of the remaining batter. 

I used a small scoop to make the muffins the same size. The scoop is easier to use if you spray it with a little of that coconut cooking spray after 4 or 5 scoops of dough. 

The mini muffins bake really fast so give them only 7-10 minutes before you test for doneness. Let them cool completely on a rack before you bag up a few as your gift. I stack 4-5 muffins then roll them in saran wrap. 

The other part of the gift is a small pot of the spiced honey butter. I put this in small ramekins that I purchase a set at a time at World Market. Each Ramekin is less than a dollar so I keep them on hand for easy gift giving.


Orange 3.5-Oz. Ramekins, Set of 4
Our Orange 3.5-oz Ramekins are the perfect color for harvest season and incredibly hand... [More]
Price: 3.96
Sale: 2.96
Buy Now
 
Put the honey butter in the refrigerator for at least an hour. Cover the top of the ramekin with saran wrap and it is ready to go. 


I stack the wrapped muffins on top of the ramekin and put them into a gift bag. Now the hosts are ready for breakfast in the morning. And another great thing, is that is recipe makes so many muffins, I get some too! I divide both the muffins and spiced honey butter and there is plenty for my breakfast as well! Or a little midnight snack when I arrive home from the party! 


Enjoy!
Laureen

Saturday, November 9, 2013

Gloves - This Winter's Fashion Statement

Picture (c)  of Vogue Magazine
I am a huge fan of elegance and decorum from the 1940s and 1950s. I also think some of the things they did for fashion make great sense today. The way they wore gloves in those days must have kept them all healthier since they weren't touching germy doors with bare hands. 

Okay, so I am a bit of a germaphobe. Alright, a LOT of a germaphobe. I wash my hands as soon as I get to my office, I wash my hands throughout the day. I touch door handles and elevator buttons with my sleeve or the back of my hand instead of my fingers. And I ALWAYS use hand sanitizer after I pump gas. 

If you think about it, we walk around touching door handles, railings, elevator buttons and such that hundreds of people have touched before us. 
Is it any wonder we pass so many illnesses around? 

So I am adding gloves into my wardrobe this fall. They will stay a part of my wardrobe through the year and not just with formal gowns or in snow. 

One of my favorite looks for gloves is worn by the editor of the magazine in the movie Funny Face. The gloves are a little longer and flared so they cover her cuffs. Click the video below to see the wonderful Think Pink clip from the movie. 


I have begun my hunt for the perfect gloves that will look great and add a certain panache to any outfit.         

Gloves can be cute and sassy at wrist length, or more mid-forearm length with a flare to keep blouse and jacket cuffs clean until you get to your destination.     

You can get great vintage finds on eBay for very little cost. Click here for the results of a search on eBay. I have recently found a seller with some great options and have purchased the ones in the pictures you see here. 

Since my favorite ones were longer, I found these fabulous flared gloves to the right. I love the detail at the wrist and can't wait to see how they look with my favorite blazers. 

I also purchased some of the short ones. I found a great deal on 2 pairs with fabulous design. I can even wear them with jeans and a sweater. 

 
I love the detailing on these gloves. They remind me of the ones the office women had on in the Funny Face video link above. 
 
The detailing on the wrist is wonderful and the colors go with everything. These gloves are made out of cotton so they wash and dry in a delicate load.    

I live in an area that doesn't get too cold so these gloves will work well for me through the winter. Those of you in snowy areas can still wear cute gloves by choosing ones that have a bit of flare and style. There are some adorable wool and leather gloves available today.
  
Cute faux fur cuffed gloves


Isotoner Tech Touch Gloves with Faux Fur C... Find arm and hand wear at Target.com! Isotoner tech touch gloves with faux fur cuff - b... [More]
Price: 19.99
Isotoner Tech Touch Gloves with Mint Polka...
Find arm and hand wear at Target.com! Isotoner tech touch gloves with mint polka dot cu... [More]
Price: 19.99


You can also wear the vintage cotton gloves when running from your house to car to the heated malls or businesses.   Add some flare to your winter accessories and join me in bringing back gloves year round.   
Think of how gorgeous and healthy we will all be! 

Yours in Style,    
Laureen 

Friday, November 8, 2013

Easy Mashed Potatoes - Any Flavor, Any Consistency!

Potatoes. Mmmmmmm. Who doesn't love potatoes? They are a staple at every Thanksgiving dinner. Every family seems to have their own flavors and textures. Do you like mashed, smashed, garlic, sour cream, or plain old fashioned? 


All of these recipes start the same way and then you can flavor as you like. Making your own mashed potatoes is so easy and they are so much cheaper and healthier than the freeze dried ones. 

Below I will describe the basics of making mashed potatoes, then how to change the recipe to add in garlic, sour cream, chives, cheese, or whatever you like. 

Here is the recipe for making Basic Mashed Potatoes
  • 3 large white or yukon gold potatoes
  • 3 tablespoons butter 
  • 1/4 cup milk
  • salt and pepper to taste
Wash the potatoes. If you are leaving the skins on, be sure to scrub off all the dirt. If you are peeling your potatoes you can give them a good rinse. If peeling, peel now. Leave the skins on for lumpier smashed potatoes or remove them for creamy smooth mashed potatoes. 

Newby Note: if you have never cooked potatoes before, stick a fork in one of the raw ones to get a feel of how hard they are. You can tell they are done when they feel like the fork goes in easily (called "fork tender").

Cut 3 large potatoes into approximately 1" cubes. The size isn't as important as trying for consistency. You want the potato to cook at the same rate so you want the chunks to be close in size. 

Add the potato chunks to a pan and add cool water just to cover all the chunks. Turn the heat on to medium and let the water come up to temperature slowly. When the water is simmering, turn up the heat and boil the potatoes for about 5 minutes until fork tender. Use a colander and drain the potato chunks. 

Your potatoes are now ready for mashing or smashing, which ever you prefer. 

Add the hot potato into a bowl for mixing. I use my stand mixer. Add the 3 tablespoons of butter to the hot potatoes. Using the whisk attachment, I turned the mixer on low and slowly increased the speed. 

Lower the speed to slow and slowly add 1/4 cup of milk (almond and coconut milk work too). Stop the mixer and salt and pepper to taste. A good starting point is 1/4 tsp salt and pepper. Taste and increase as needed. 

If you want smashed potatoes, mix until you like the consistency. If you want smooth whip until the are smooth. If the mixture seems too thick, add more milk. 

This whole potato process takes about 40 minutes due to the length of time it takes for the water to heat.

Recipe Variations

For Garlic Mashed Potatoes, you can roast garlic (Click here for instructions) or you can get garlic seasoning from your grocery. There is garlic powder and garlic salt. If you purchase garlic salt, do not add the salt mentioned in the recipe above. Use the garlic salt instead. Add the garlic when you add the salt and pepper.

For Sour Cream Potatoes, add sour cream instead of the milk. If the consistency is too thick, you can thin it by adding a tablespoon of milk at a time until it has the consistency you want.  

For Sour Cream and Onion Potatoes, make the sour cream potato recipe and  add onion powder to the mixture when you add the salt and pepper.

For Sour Cream and Chive Potatoes, make the sour cream potato recipe and add in fresh chopped chives right before the final mixing. Sprinkle a few on top after you put them in a serving dish.

For Cheesy Potatoes, grate a half cup cheddar or parmesan cheese (you can add almost any cheese you like). Add it to the hot potatoes with the butter. Taste before adding the salt because some cheese varieties are pretty salty. Since the cheese can make the potatoes thicker, you may need to add a little more milk. Add additional milk 1 tablespoon at a time until the consistency is what you like. 

Let me know in the comments if there are other types you enjoy! What type of potato do you eat for Thanksgiving? 

Laureen 


Sunday, November 3, 2013

First Thanksgiving with fresh Cherried Cranberries!

Barbeque Turkey on the spit
I'm really happy this fall. I get 2 Thanksgivings. We have family visiting this weekend so we are having what we are affectionately calling "First Thanksgiving." First Thanksgiving will have all the lovely foods of the Thanksgiving we will celebrate at the end of this month but we get to eat it early. 

In my family we each make one or two things so no one has to cook all day. I have a huge family and we all cook something. My contributions are cranberries (real ones, no cans involved) and the non-alcoholic drink station. 

For the drink station, we put out water with lemon and cucumber. It is very 
easy and looks festive. I also like to provide a different flavor for the
non-drinkers and kids. This year we have bottles of pink lemonade and raspberry lemonade. You can make your own if you are really ambitious or you can do like I do and get pre-made ones and fill the bottles.

If your family traditions include cranberries in the shape of a tin can, then this recipe may not be for you. But if you like real fruit that tastes fabulous, then give it a go. You can make these well in advance and they are just as good. 

Since we will be having more than 30 at our celebration, I triple the recipe. You can use a smaller pan for the recipe below.  


Cherried Cranberries 

(adapted from a recipe by Traci's Grandmother)

1 lb cranberries, washed and stems removed
2 cups sugar
3/4 cup water
1 teaspoon cinnamon
1/4 tsp each baking soda and salt


Clean the cranberries. I put mine in a colandar and swish them around with my hand with the water running. If you see or feel a lot of stems. Turn off the water and go through each cranberry to make sure the stems are broken off and washed away.  


Put the cranberries into a saucepan and add in all other ingredients. 

Note: I make a lot of cranberries and double or triple this recipe due to the number of people I need to feed. You will have about half the cranberries shown in these pictures. 
Bubbling soda--not boiling yet

Mix all ingredients to combine well.  Turn the heat to medium high until the mixture comes to a boil. 

Make sure it's really boiling, the soda will bubble.
I peeked so you don't have to

Lower heat and simmer covered for 15 minutes. No peeking. We want the sugars to dissolve and thicken. I took the picture to the left and peeked so you don't have to wonder what is going on in there. 

After 15 minutes of simmering, remove from heat and let cool. Keep covered until cool. 

You aren't supposed to peek during this part either, but I peek and taste. If too bitter add more sugar while it's hot so the sugar will dissolve.

Let cool, put into a pretty bowl and you are ready to serve. These can also be made a few days in advance and refrigerated, or far in advance and frozen. 


Let's eat!
Laureen