Friday, August 23, 2013

But It's So Pretty! -- How Stylized Photos Lead You Astray

See the wrinkles? Not photo-shopped
I love looking at pictures of parties on Pinterest (say that 3 times fast). They are so well set and look gorgeous. The picture shows amazing setups and new and different things: crystals shine, flowers are fresh, and greenery is perfect. When we try to duplicate it, we feel like failures. Notice how many Pinterest Fail sites have popped up. Waaaay more than there are Pinterest Success sites. 

So lately I have been looking at these pictures with a critical eye and I figured out something: some of the pictures can't be reality. I know that should seem obvious in this day of photo-shopping even the most perfect of bodies on a magazine cover, but for some reason I believed the Pinterest boards more.

Dusty Miller

Flowers that wilt

In my work with flowers I have learned a few things. Dusty Miller, that pretty gray leaf you see tucked into flower arrangements, wilts within hours. So while I can make a gorgeous bouquet, keep it in a fridge, spritz it with water and snap some shots of it, you can't really use it effectively in a real bouquet. It will die before you get the pictures done before your ceremony. The same holds true for Lambs Ear. 

If you want to include this in your flowers, and your floral designer agrees, ask them how they plan to keep it from wilting. They may have a special technique or you may not be getting married in the heat, but make sure your bouquet can look like you want it to for the whole day. 


Where are the stems? 

Flowers have stems. Almost all of them!
I am noticing more and more centerpiece pictures with gorgeous crystal clear vases. There are no flower stems in the vase. I know that huge ball of roses has stems. Where are they? Note that if you choose a picture like that for inspiration, your flowers will have stems. So you won't have that gorgeous clean table because they whole look changes when you fill that vase with green.


Packed Tables

Allow guests to see each other
Some tables are gorgeous and lush; the centers are filled with candles and flowers and picture frames and various knick-knacks. The area for the guest to enjoy their food is small. Really really small. Make sure to plan your table so guests can see each other across the table, and have a small place to put the program, guest favor, etc. The table on the right has room for the guests. 


We all like to dream and look at gorgeous things. There is nothing wrong with pinning pictures of the items I have mentioned above. But when it comes to planning an event, make sure the look is possible. There are many ways to make your entertaining gorgeous without defying the laws of physics or encroaching on your guests' personal space. Look for reality and your dream party can come true. 

Laureen


Wednesday, August 21, 2013

DIY Weddings and Entertaining - Win your personal Signature Cocktail or Mocktail Recipe!

I have had great feedback on my signature cocktail post and lots of people asking me to create a recipe for them. Now you can win a recipe for your very own signature cocktail! If you don't drink alcohol, I can create you a mocktail.

Sign up to follow my blog and in the comments tell me the following information:
  • Event type
  • Your colors
  • Theme
  • Type of alcohol you like (for mocktails, give me flavors or juices that are your favorite)
  •  Anything else that will help me make you the perfect cocktail (or mocktail!) 

**Note: You do not need to be getting married to enter this contest. Anyone can enter! Comments are not automatically published so don't be concerned if you don't see your entry below.

On Saturday, August 31, 2013 I will pick one lucky winner. The recipe and name (named for you, of course) will be posted the first week of September! 
Hurry, all entries must be received by midnight, August 30, 2013 to be considered!


Monday, August 19, 2013

Easing into Fall -- Planning your autumn event

As the summer comes to an end, kids head back to school, and some areas of the country start to cool it's time to start thinking about celebrating fall. 

I love the autumn time. Well, I like the idea of autumn. You see, living in Southern California we don't usually get much autumn. Our summers often last until almost Halloween. 

But in many other areas of the country the cooler weather is already starting to hit. I love cool weather and all it brings with it. 


If you are planning a wedding or event in the fall, there are so many things you can use for inspiration. You don't have to use the standard pumpkin colors.


I used the picture above as inspiration for the color palette. The wet rocks and autumn leaf can lead to gorgeous grays and a cinnamon-gum red. Not a black or orange in sight. 


I took the next inspiration from one leaf. People usually think of yellow as a spring color but you can easily find shades that works for fall. These shades of yellow would be beautiful for an autumn wedding and different than all the other brides. 

Imagine a bridal bouquet of creams and light yellows and corals. Or crisp white tablecloths with gray table runners and yellow napkins. 

These colors also make great birthday party colors. Bright and cheerful yet still keep with the season. 

As summer moves into autumn, think outside the pumpkin for inspiration. You can easily make your wedding unique and all yours. 

Contact me if you would like help determining your color palette. My Event Design and Coaching services can help you get started and give you just enough information for you to take the lead and DIY your big day. 

Let me know how you like these new palettes in the comments below. 

Laureen 


Sunday, August 18, 2013

Event Signs - DIY professional looking menus with how-to instructions

In my last post I showed a sign I had made for an event I threw earlier in the year. 

The sign looks like a chalkboard sign but it was created in MS PowerPoint and printed on my printer--much easier to edit than a chalkboard sign. 

In PowerPoint start with a new file. Click the Design tab and choose the Apex  design option. This will give you the grey background with the reflection. 

Return to the Home tab and in the New Slide box use the Layout Drop Down to change the layout to Two Content. You now have the basic structure of the sign. 

To make the header banner, click on the Insert tab. Click the Shapes Drop Down arrow and find the Stars and Banners section. You can choose any banner you like. I selected the Up Ribbon option.

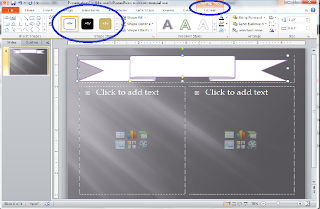
Stretch it to make it fill the whole top area of the slide. Click the banner and a new tab will show on the menu called Drawing Tools Format. Click the tab. The screen shown below will be displayed. 


Click the Shape Fill and select Textures. I used the Marble and then changed the transparency. You can choose whatever you like. 

Next we select Fonts. Again, play with the ones you have available and see what you like. I used Edwardian Script with a font size of 80 for the word "Bar". 

For the titles of the drinks, "The Julie," I used Segoe Script with a 44 font. And for the ingredients I used Book Antiqua, font size 24. 

I updated the bullet styles to be something I found visually appealing. I used the same style for the menus on the buffet tables as well.

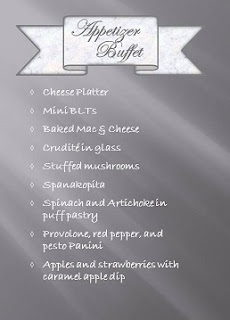
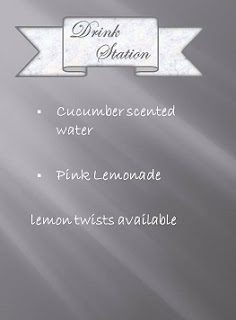
I used the same design for these but made them so they would fit in 5x7 frames. 

I also changed the body font to Bradley Hand ITC.

These signs were so easy to update. So easy to frame. And they looked great on the buffet tables and drink stations.


Have fun with your signs and make them unique to you. You can use the tools you already own to create great looking accents to your party tables. 

You CAN create your own wedding, anniversary party, or other event. 

If you have questions, ask me in the comments. Let me know what you think of these signs! Have you created your own signs? How did you do it? 

I look forward to hearing from you! 
Laureen


Friday, August 16, 2013

Signature Cocktails - DIY Entertaining and Weddings

 Friday nights for me include kicking off my work week shoes and enjoying a cocktail. It can be as simple as a good red wine, or as complex as an old fashioned Manhattan. I have also become adept at creating new recipes on the spot based on ingredients I have on hand. 

What I want depends on the season, my mood, how the week went. 

I try to keep the basics on hand, but sometimes a little something sparkling or fruity hits the spot. As summer turns to fall, I like bourbons, brandys, cognacs, and more rich combinations.

Playing with drink recipes not only gives you the ability to have your own version of a particular favorite (for me, there is nothing like a good Manhattan), but also gets you familiar with the blending of tastes so that you can create signature drinks.

When I threw the bridal shower for my niece earlier in the year, I created 2 signature drinks for the party and named them for the bride and groom. The bride's favorite alcohol is sparkling wine and the groom has a fancy for bourbon (YAY!).

Let me introduce you to Julie and Jarrod. They both have an affinity for mid-century styling and they look amazing in pictures. 

Seriously, this is their engagement photo. Pretty cute, cool, and Mad-Menish, right? They set up a speakeasy the week before their wedding for guests who were in town early. They are one of those couples that has style.

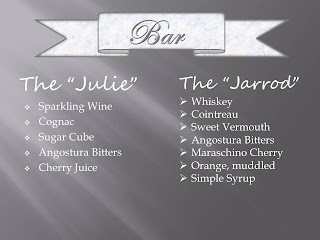
So based on their personalities and their tastes, including their favorite alcohol, I created the drinks shown below: 
 
This is an image of the sign I used at the shower. Even though it was a girl party, Jarrod was there in spirit through the drink I created in his honor.

The "Julie" is loosely based on a champagne cocktail which was popular in the 1940s and 1950s. The "Jarrod" is based on a Manhattan, another drink popular in the mid-century and my personal favorite.

I need to take a minute to give a shout-out to my uncle, Dan DeSantis, for teaching me what a Manhattan should be, and for telling me his recipe. He also taught me to drink good wine, but that is for another post. Dan really does make the best Manhattans, but mine are a close second.

I mixed up the "Jarrod" makings in a large pitcher and had ice and a shaker ready to finish them. I added a splash of the maraschino cherry juice and a couple of cherries for garnish. 

The "Julie" you make in a champagne glass. Drop a sugar cube in the bottom of a glass. Add a couple of dashes of bitters and a small splash of the maraschino cherry juice. Add a half shot of cognac and then the sparkling wine until the glass is full. It turned a beautiful pinky color, which matched the shower. The sugar cube makes the sparkle come out of the wine and it will continue to bubble as you drink it. 

Signature drinks are a fun way to add a fun detail to the party. Offer a few options as well as the separate liquor--for example, I had extra bottles of sparkling wine for those less daring souls. 

Have you made a signature cocktail for an event? How did it turn out? Are you planning an event and want to include a signature cocktail? Leave a comment below and I will do my best to help! And for those that prefer mocktails, let me know and I will post some of my favorite recipes for you. 

Cheers!
Laureen 

Wednesday, August 7, 2013

Wedding Inspiration, Parties, Events -- Help is here!

These days, many of us like to create our own parties. We know best how we want to entertain our guests. I fully support and applaud all who want to do it yourself. By planning and choosing all aspects of the event yourself, you can have exactly what you want and keep it within your budget.

To support you DIYers, especially brides and grooms, I am now offering Event Design and Consulting services. Come to me if you need help getting started, if you get stuck, or just want some questions answered. It's your event, you hold the reins, but have the security of having a safety net just in case. 

One of my color palettes is shown above and another to the right.This is just the beginning. I can help you map out your table designs, floral combinations, and suggestions on site options within your budget. 


Even if you want to do only part of the event creation yourself, it's your day, you should be in control. 

Sometimes we just don't know where to spend and where to save. Or how to save. I can help you with that as well. 

With Package One, I will work with you to determine colors (including exact Pantone colors to use when printing), samples of tables designed specially for you (buffet or sit-down), suggested cake styles and special ways to make the day represent you and your fiancee. It also includes 1 hour of phone coaching to answer questions and provide assistance. 


Above, is a color palette I creaed for a woodland wedding. Below you can see how the palette came to life. 

 
As you can see, the site was fabulous and needed little decoration. The wedding site was hung with tissue paper poms, and had small flower arrangements on the ends of the benches (flowers were also done by L Knudsen Studios). These arrangements did double duty when they were brought to the bar and around the reception lodge post-ceremony.

My second level package includes everything in the basic package plus full reception site design including bar and drink stations, overall decor, and lighting. I will also include the master list of everything you need to buy to complete your plan. Level 2 package also includes 2 hours of coaching and consultation to give you the help you need to be successful. 

Level three package includes procurement of the items you need and they will all be shipped to your door. Unique floral designs will also be created for your bridal bouquet and groom's boutonniere.

You can add the following options to any level of package:

  • Floral design for bride(s) and bridesmaids' bouquets, flower girl design, and boutonnieres for the groom(s) and groomsmen. 
  • Floral design for centerpieces, bridal party table (or sweetheart table), including full list of flowers needed and recommended types of flowers depending on weather.
  • Full To Do list, specifically designed for you that includes month by month goals to meet. If you are planning to DIY your wedding this can be invaluable to ensure you aren't spending the week before your wedding in a panic. 
  • Back-up! If you find that you are running out of time and haven't gotten projects done, I can fill in some of the DIY work for you. Rates depend on panic level and my schedule availability.
So keep the project in your hands while getting the help you need to create your dream day.
And drop by my website at L Knudsen Studios to see what we are up to.

Laureen

Tuesday, August 6, 2013

Party Supplies - What to rent, What to buy (and where)


I have a confession to make. I love party supplies. Love them all: plates, glassware, flatware, serveware, vases, cake plates--oh my! They make me happy. I collect party supplies like other women collect shoes.

People wonder how I can afford to have all the party supplies I need for just about any event. Well, this post will let you in on my secrets.

The picture above shows just a few of the items I have: white caterer-style tablecloths, granite slabs for cheese, flatware, serving items, vintage luggage, cake stands, brass candlesticks for flowers, platters, tongs, small ceramic plates, etc. 


Accumulate during end of season sales

Right now almost everyone has an end of summer sale. If you are having a wedding or anniversary party next spring or summer, now is the time to stock up. If you know your colors, head to the store to see what they have. When I was planning my wedding, I found beautiful vases, candle holders, and platters in my colors.
You can find tablecloths (for overlays, I will tell you how to get the caterer-style ones in a bit), beverage servers, items to use for cute centerpieces (check out the garden sales for unique containers). Every time you go into a store with a summer sale, walk through the aisles and pick up things that will work for your party. If it won't work or you don't love it, don't buy it. Another way to save money is to not spend it in the first place. 

If you want sparkles, wait for the Christmas sales. You can get inexpensive sparkly items after the holidays. Stock up on New Years items and transform them into Hollywood Glam or Great Gatsby.

Want to make tissue paper poms? Stock up during the Christmas sales when they dump their wrapping paper. Or stock up from the warehouse stores when they put out their holiday supplies.


Rental supply sales

Rental companies sell off their older items for great prices. I purchased large white tablecloths from a local rental company. Some of them had a small cigarette burn, or a stain but they could be easily covered by the cloth you put on top. I purchased huge tablecloths to use for buffet tables for $10 a piece! These tablecloths wash up nicely and can be used again and again (I have had mine for 10 years). I keep them folded and hung on a hanger in a spare closet and they stay really nice. 

Drapes, lace overlays, sheer panels

One word: IKEA! They have curtain panels that are sheer, lace, pattered, etc. for less than $20. One pair of sheer panels that are 57" x 98" are $12! Create gorgeous drapes with ribbon ties, panels blowing in the wind, or any other design you want. CHEAP! 

Centerpiece items

At some recent parties I have used antique brass candlesticks for centerpiece bases. I purchased all of these on eBay. Create a search on eBay and save it. Have an email sent to you every time there are new items that match your search. The most I spent for one of my brass candlesticks was $8. I now have 14 antique brass candlesticks that I can use. 


If you see a look you like in a magazine or online, go set up your eBay search and purchase the items yourself. Even if you aren't doing your own flowers you can save a lot of money by providing the items to your florist. 

Glassware, flatware, cake plates, plates, serveware

I have quite a few websites I use to find items but overall, I get great savings on catering supply sites. Search for catering or restaurant supply websites. They often have sale items and outlets where you can get serveware

Also look for sales at your local stores. You can find cake plates for very cheap if you walk through the clearance section of your favorite discount store. 

And don't forget IKEA. They have glassware, flatware, cutting boards, bowls, compotes, etc. etc. 


If you give yourself a year to plan your wedding, you can save a bunch of money by making your plan early, shopping around, and tracking what you have purchased and what you still need.

If you need help with this, let me know! I can help with event design and help you create your plans for much less than hiring an even planner. 

Laureen

Sunday, August 4, 2013

DIY Wedding and Event Inspirations -- Strawberry Cheesecake Parfaits


All celebrations need dessert. Whether it's a wedding, shower, birthday, anniversary party; all of them require something special to end the meal.

Recently, I have liked the trend that offers multiple desserts so guests can choose or have a bite of each. 

For a recent party, I ordered a 2-layer frosted cake, but then also served lemon poppy-seed Bundt cake with blueberry compote, homemade butter mints, and strawberry cheesecake parfaits.

To make the cheesecake parfaits, I like to use a cheesecake recipe that doesn't need to be cooked.

The recipe I used is one that my family has been using for years. I think it was originally from a wrapper of a sweetened condensed milk can. It is super simple to make and tastes divine!

Cheesecake recipe

2 -8 oz packages cream cheese, softened
2 cans sweetened condensed milk
2/3 cup lemon juice
2 tsp vanilla extract 

Put cream cheese into a food processor and process until smooth. Add sweetened condensed milk and blend. Pour in lemon juice and vanilla and process until all ingredients are incorporated and mixture is smooth and creamy. 

That's it. Really. You can put this into a graham cracker crust or into small glasses with fruit like I did.

I put the mixture into a large plastic baggie and clipped a 1/4 inch hole in one of the bottom corners. I piped the cheesecake into the bottom of a glass, added a few pieces of sliced strawberry, then piped more. I added more strawberry slices to the top and viola! Strawberry Cheesecake Parfaits. 
 I hope you enjoy these as much as we did. Leave a comment if you need more information or help with designing your parties.

Laureen